Introduction
HAPI is a language that you use alongside html that gives you the power to make API calls to dynamically load data.
Essentially, you will be able to conduct server side programming using html and PeopleVine data via "sombrero
tags"
{@ @}
NOTE: HAPI only works within the PeopleVine platform
Example Usage
Example: Let's say you want to pull in some blog posts you created in PeopleVine to build a "news" section to your website.
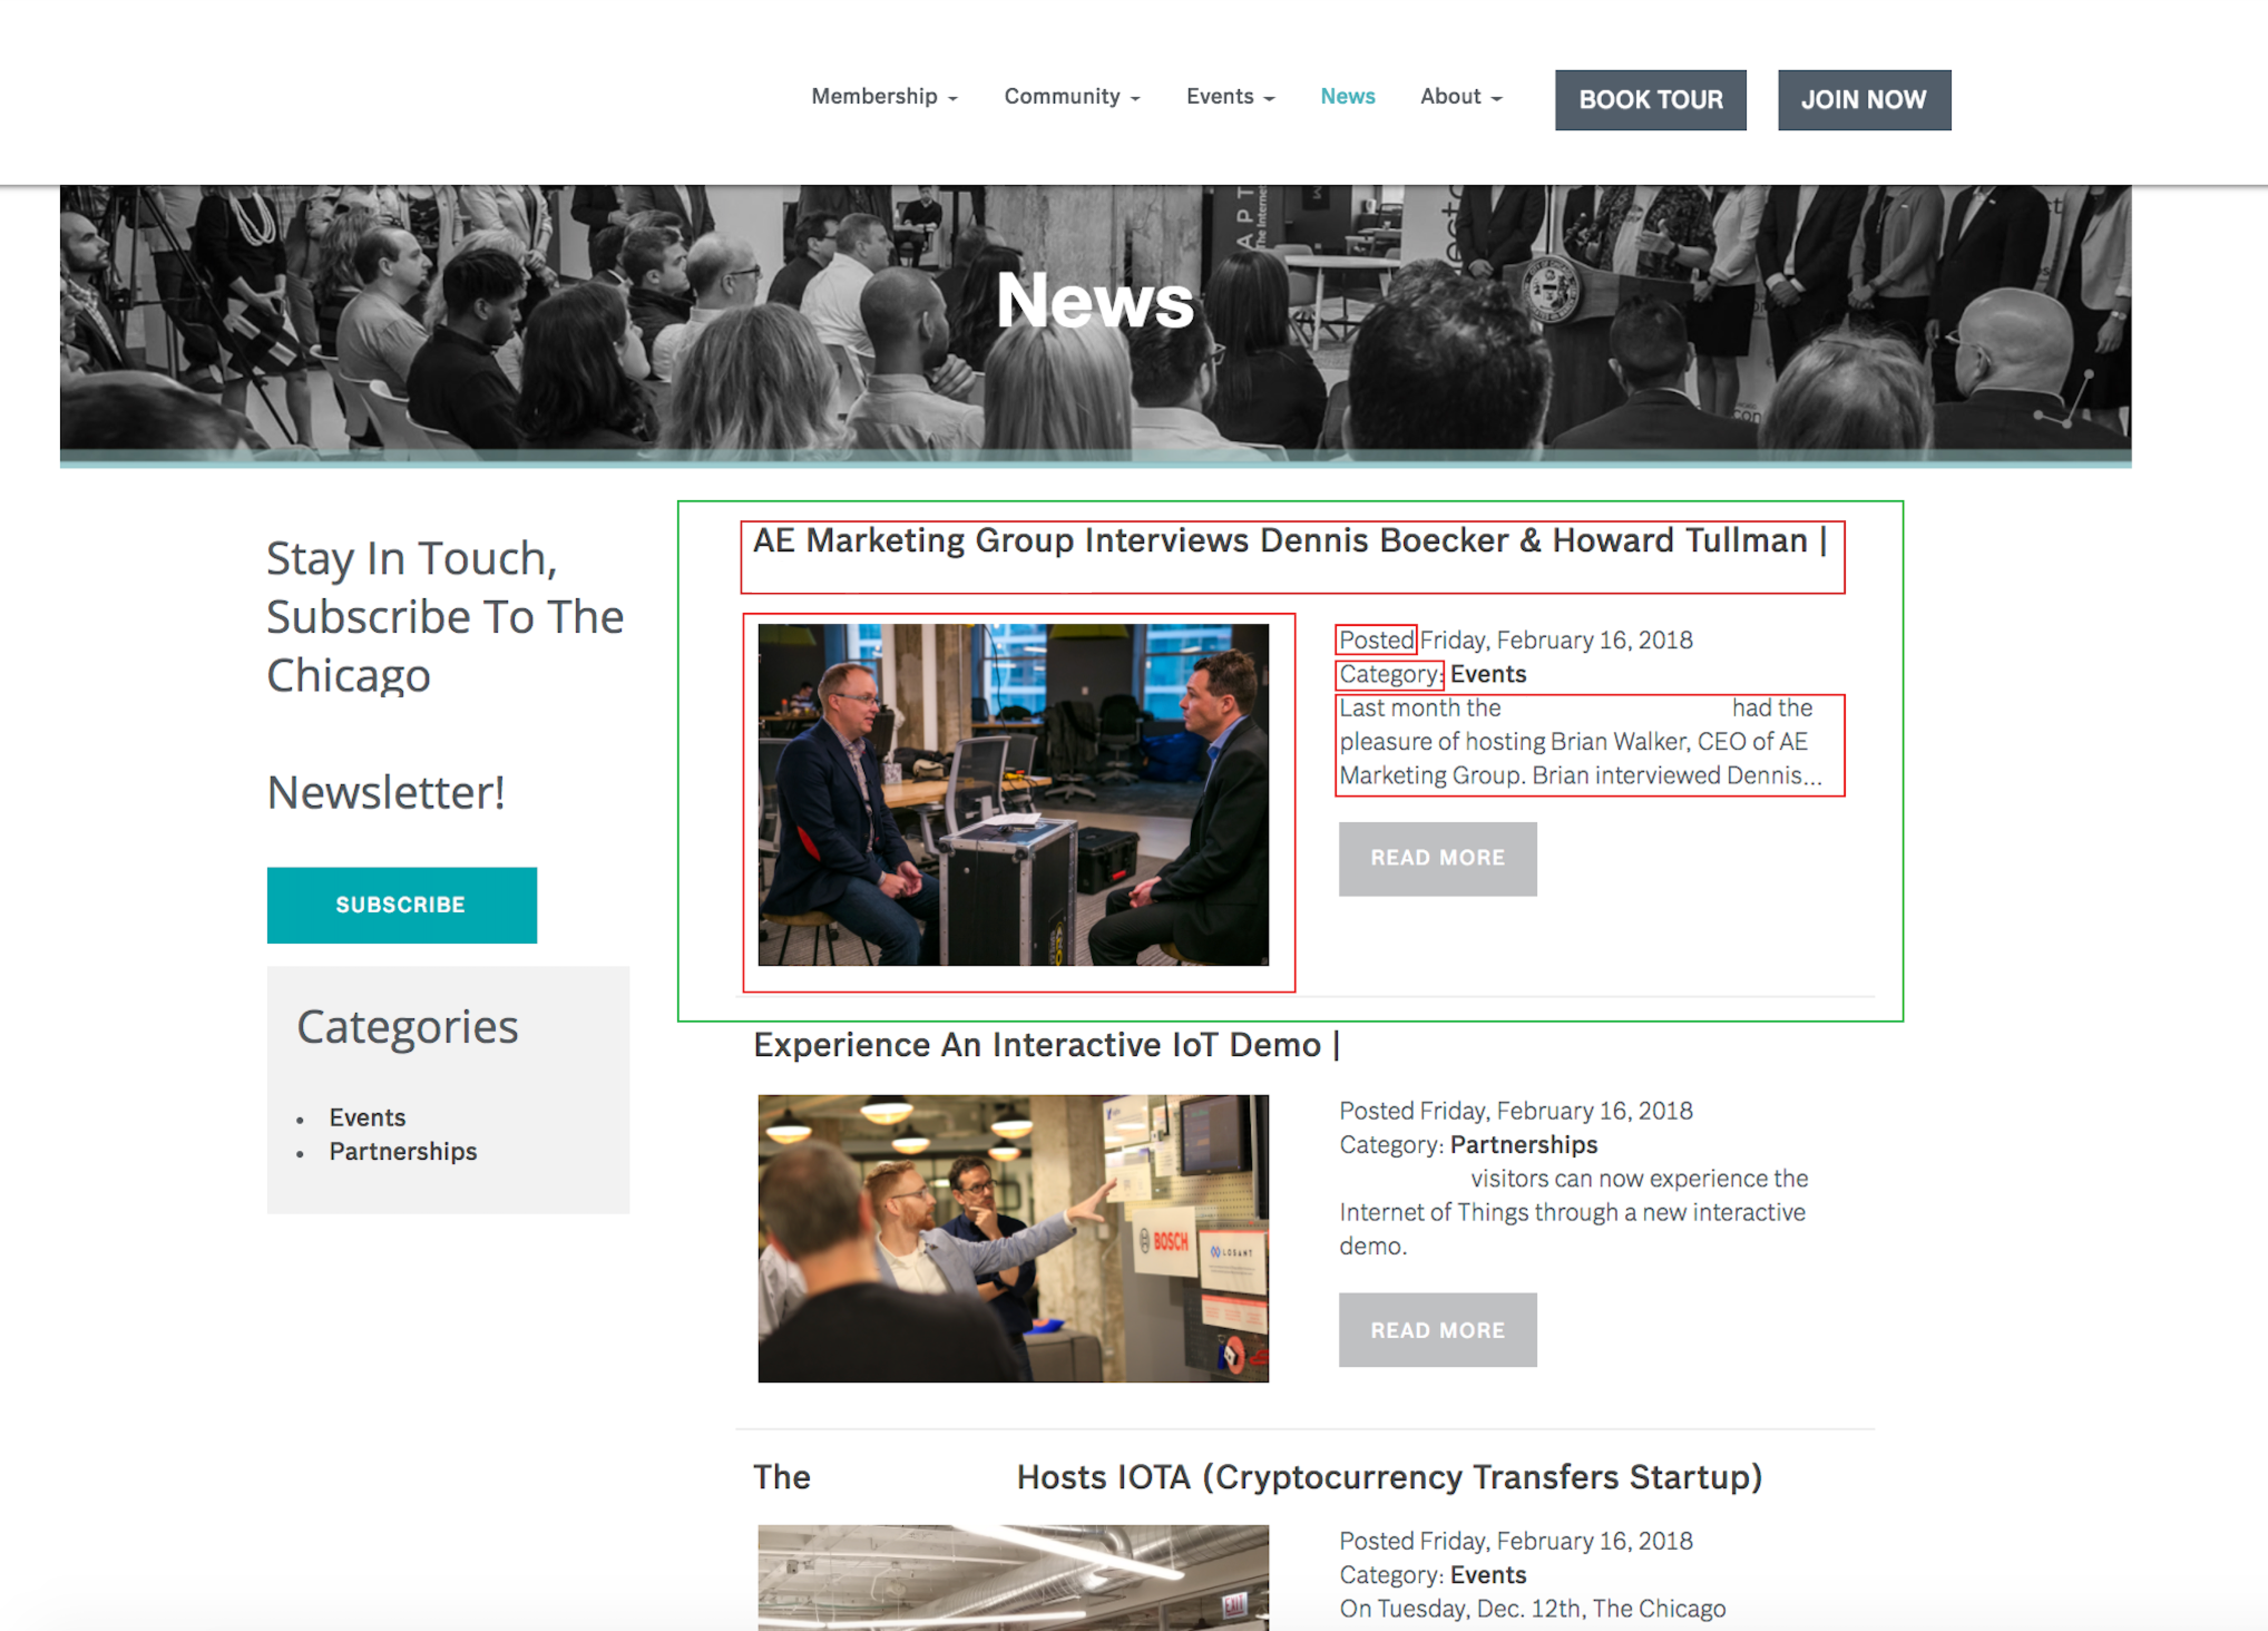
The parts of the blog posts that HAPI will call back are:
- Post Title
- Date Posted
- Category Type
- Description
- Post Image
To begin, start coding your layout with HTML
                        <ul>
                            <li>
                                <a href=""><h1> title here </h1></a>
                                <img src="" alt="">

                                <div>
                                    <p>Posted <span> date here </span></p>
                                    <p>Category <a href=""> category name here </a></p>
                                    <p> text here </p>
                                    <a href=""> Read More </a>
                                </div>
                            </li>
                        </ul>
In this case, our "wrapper" is the ul element, and we want repeating li elements that populate with different information.
li tag) to identify which PeopleVine component you are loading data for.
- data-pv-component="content"
Next, use data-pv-type to signify the type of content to load on the screen, typically a repeater or form
- data-pv-type="list"
- "list" will display a list of content pages based on parameters.
Moving on, we want to add data-pv-parameters. In this example, let's say we want to pull the 5 most recent blog posts.
- data-pv-parameters="{page_type:'blog', returnTotal:'5', 'sortby':posted_on, from_date:'1/1/1900 12:00 AM', to_date:'4/29/2024 6:40:34 PM', category_no: {@qs:category_no@}} "
The wrapper element should now look like this:
                    <li data-pv-component="content"
                        data-pv-type="list"
                        data-pav-parameters="{page_type:'blog', returnTotal:'5', sortby:'posted_on', from_date:'1/1/1900 12:00AM', to_date:'4/29/2024 6:40:34 PM', category_no: {@qs:category_no@}}">
Now that our "repeater" is finished, we will move onto the contents of each li element
First we want to link the anchor to the right path.
<a href="/news/24829">
Next we use HAPI to pull in the page title into the h1 tag.
Since we want the information to fill the content of the tag, rather than the value of an attribute, we are using data-pv-element.
<h1 data-pv-element="page_title">
The next element we want HAPI to pull in is the image source.
<img src="{@page_photo@}" alt="{@page_title@}">
Next up we will use HAPI to pull content for the date posted and category.
Date Posted
- data-pv-element="posted_on"
- data-pv-formatter="date(dddd, MMMM d, yyyy)"
<p>Posted <span data-pv-element="posted_on" data-pv-formatter="date(dddd, MMMM d, yyyy)">
Category
- a href="/news?category_no={@category_no@}"
- data-pv-element="category_name"
<p>Category <a href="/news?category_no={@category_no@}" data-pv-element="category_name">
We need to pull in the event description and link the "Read More" button to the correct path
Event Description
- data-pv-element="text_preview"
<p data-pv-element="text_preview">
Read More button
- href="/news/24829"
<a href="/news/24829"> Read More </a>
Finally, you can add some peoplevine-grid and bootstrap classes to help style the information
                        <ul class="pianoList">
                            <li data-pv-component="content" data-pv-type="list" data-pv-parameters="{'page_type':'blog','returnTotal':'5','sortby':'posted_on','from_date':'1/1/1900 12:00 AM','to_date':'4/29/2024 6:40:34 PM', category_no: {@qs:category_no@}}">
                                <h1><a href="/news/24829"><span data-pv-element="page_title">Blog Title</span></a></h1>
                                <div class="grid">
                                    <div class="grid-col grid-col_6of12">
                                        <img src="{@page_photo@}" alt="{@page_title@}">
                                    </div>

                                    <div class="grid-col grid-col_6of12">
                                        <p>Posted <span data-pv-element="posted_on" data-pv-formatter="date(dddd, MMMM d, yyyy)"> </span></p>
                                        <p>Category: <a href="/news?category_no={@category_no@}" data-pv-element="category_name"> </a></p>
                                        <p class="limit" data-pv-element="text_preview"> </p>
                                        <a href="/news/24829" class="btn btn-gray buttn" id="rm"> Read More </a>
                                    </div>
                                </div>
                            </li>
                        </ul>
General Principals - Outer Block
Component (data-pv-component)
When writing your HAPI statement, add the first command "data-pv-component" to the outer call. This is used to identify which PeopleVine component you are loading data for. They are specific to the PeopleVine platform and allow full customization when and if you like to switch or edit content.
Type (data-pv-type)
This signifies the type of content to load on the screen, typically in a repeater or form.
ID (data-pv-id)
Used to load a specific resource on the page e.g. a specific product, event or content snippet.
Parameters (data-pv-parameters)
You can place a JSON parsed string in here to query through the data (see API)..
- You can also access referenceTypes passed in bu using {@referenceType.survey@} which will bring back the survey_no of the submission.
Example: data-pv-parameters="{customer_no: 251714, sortby:'order_date desc', returnTotal: 5}"
We will also auto pass in the customer_no and business_no of the logged in user in order to filter the results. If you want to omit the auto populating, then add business_no:0 or customer_no:0 in the data-pv-parameters list.
Object (data-pv-object)
Will automatically place the data object in a <script> tag for javascript purposes.
Conditional (data-pv-conditional)
Will only render this code if the conditional is met (e.g. data-pv-conditional="{@sport@}=Baseball" where {@sport@} is the parameter and Baseball is the value.
- Supports attribute(NAME OF ATTRIBUTE) instead of
- {@FIELD@} pulls from the parameters or querystring
No Result Message (data-pv-noresultmessage)
data-pv-noresultmessage="Your message here" will display this message if no data is returned.
General Principals - Inner Block
Element (data-pv-element)
This is the data field to be loaded in between the HTML tags. These can be identified within the API documentation.
- Enter the element name (e.g. first_name )
- Get a secondary element with . (e.g. customer.first_name)
- Get a value from an array with [] (e.g. social_networks[facebook]).
Formatter (data-pv-formatter)
Min & Max (data-pv-min / data-pv-max)
This is used to set the min and max on a select dropdown.
Link (data-pv-link)
Grabs the URL associated with the tag and sets it as the href.
Firstclass (data-pv-firstclass)
Used to assign this class to the first element.
Prefix (data-pv-prefix)
This will prefix the value with this text.
Suffix (data-pv-suffix)
This will suffix the value with this text.
Repeater (data-pv-repeater)
This allows you to use a subset of data and parse through it (e.g. responses in surveyResponseData).
Advanced
When using HAPI, how do I find what fields are available to use?
When writing your HAPI statement, add a new command
data-pv-object="< name="" />" to the outer call.
This will
then output a new javascript object on the page called < name="" /> (or what ever you replace it with).
You can then go into the console on your web browser (typically developer tools, F12, inspect element)
and type the new object's name to display properties.
Using Conditional Logic with HAPI
With our HAPI language you can now include conditional logic on whether or not to display a data-pv section. Simply add the following tag to the component section:
data-pv-conditional="{@variable@} = value}"
{@variable@} is the variable that's either passed in the parameters section or via the query string in the URL. The value should be plain text or numbers without any quotes.
For example, notice how we display only the certain block that matches the {@sport@} parameter.
                <div data-pv-component="text">
                    What sport do you like?
                </div>
                <div data-pv-component="text" data-pv-conditional="{@sport@} = baseball">
                    Baseball
                </div>
                <div data-pv-component="text" data-pv-conditional="{@sport@} = basketball">
                    Basketball
                </div>
Template - Event Grid - HTML Render Engine
Leverage this example to display a grid of upcoming events on your landing page or in your newsletter (styling may need to be updated for newsletters).
<div class="ui-update">
    <ul class="blocks blocks_equalHeight blocks_3to2to1">
        <li data-pv-component="event" data-pv-type="eventList" data-pv-parameters="{sortby: 'date_asc', returnTotal: 6}">
            <div class="blockTile blockTile_alignLeft">
                <div class="blockTile-hd blockTile-hd_flush">
                    <div class="imgMask imgMask_fluid">
                        <a class="" href="/event/{@event_no@}"><img class="imgMask-img" data-pv-alt="event_title" data-pv-element="event_graphic"></a>
                    </div>
                </div>
                <div class="blockTile-bd">
                    <ul class="vr vr_x2">
                        <li><span class="txt txt_enlarged mix-txt_medium" data-pv-element="event_date" data-pv-formatter="date(MMMM d yyyy h:mm tt)"></span></li>
                        <li>
                            <a class="" href="/event/{@event_no@}"><span class="hdg hdg_4" data-pv-element="event_title">Event Title</span></a>
                        </li>
                        <li class="vr-override_x6"><span class="txt txt_enlarged" data-pv-element="event_summary">Summary of the event</span></li>
                        <li><span class="hdg hdg_6" data-pv-label="label.venue">Venue</span> <span data-pv-element="event_venue">Event Venue</span></li>
                        <li><span class="hdg hdg_6" data-pv-label="label.location">Location</span> <span data-pv-element="event_location">Event Location</span></li>
                    </ul>
                </div>
                <div class="blockTile-ft">
                    <a class="btn mix-btn_stretch" href="/event/{@event_no@}">View Event</a>
                </div>
            </div>
        </li>
    </ul>
    </div>
HAPI - Include responses from a form in an e-mail confirmation
This tutorial will help you include a confirmation email to people which includes the answers to questions they completed in a form. This can be used to ensure people selected the right value, confirmation email for accepting an agreement, etc.
- 1. Login to the PeopleVine Control Panel
- 2. Setup your Form
- 3. Setup a new Email Notification
- 4. Include the following markup (more importantly the data-pv tags) in your email body
<div align="left" data-pv-component="survey" data-pv-parameters="{customer_no: , survey_no: {@referenceType.survey@}, survey_response_no: {@referenceType.survey_response@}}" data-pv-type="response" style="text-align: left;">
                    <ul>
                        <li data-pv-repeater="responses"><b data-pv-element="field_label" style="font-weight:bold;">Field Label</b>: <span data-pv-element="survey_answer">Response</span></li>
                    </ul>
                    <div></div>
                </div>
- 5. Setup the notification to go out after a form is completed.
Loading customer attributes on a page or email
By using HAPI tags, you can include customer attribute values directly on the page. The simplest form is to enter the following tag where you want the data to be displayed. Simply replace attribute_name with the stored attribute name/group.
Upon rendering the page or email, it will pre-fill this attribute with the real value on file.
Alternatively you can also use the customer attributes in a conditional tag in HAPI as such:
Next 6 months